Hot Cocoa Bombs With Fruity Pebbles Recipe
Last Updated on October 27, 2022 by Janell
Hot cocoa bombs are all the rage right now! Did you get any for Christmas or have you tried to make them at home? They are really so fun and this recipe is so versatile!
There are many hot cocoa bomb recipes out there - so I have a really unique and fun option to share with you! This recipe uses Fruity Pebbles to add extra flavor and to make it extra colorful!

The best thing about this recipe is that it is so versatile! Just take the basic hot chocolate bomb recipe and make it your own with many different add-ons!
Here are some Hot Chocolate Bombs variations:
- Mini M&Ms
- Broken up candy bars like Kit Kats or Reese Peanut Butter Cups
- Try it with a different cereal
- Or use a flavored cocoa mix to make a salted caramel or dark chocolate hot cocoa bomb!
- Use different colored candy melts to change up the colors.
- Add Sprinkles or candy sugar
Seriously....you can add so many things to these hot chocolate bombs to create something that everyone will love!

Enjoy it with some of my favorite dessert recipes:
- Chocolate Peanut Butter Overload cake
- Chocolate Chip Cake With Whipped Chocolate Buttercream Icing (My Favorite!)
- Brownie Mix Cookies – Just 5 Ingredients!
- Best Chocolate Cake Recipe
- Chocolate Whoopie Pies With A Marshmallow Filling
- Chocolate OREO-Stuffed Cookies Recipe
So are you ready to get started? Grab the ingredients and get ready to enjoy some fun hot chocolate bombs during this freezing cold weather! Im even cold in Florida this week!
This blog post contains Amazon Affiliate links. I earn a small commission when you use my links. Thanks!
Scroll to the bottom of this post for the printable recipe.
Fruity Pebbles Hot Cocoa Bombs
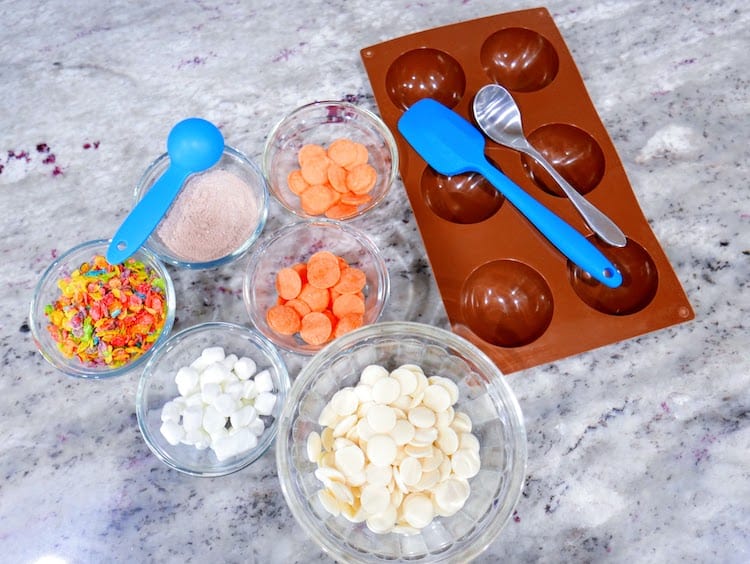
Ingredients:
- 1 ⅓ c white candy melts
- ½ c orange candy melts, divided
- ½ c Fruity Pebbles Cereal
- ¼ cup mini marshmallows
- 3 heaping tablespoon hot cocoa mix
- Silicone spatula
- Small spoon
- Silicone half-sphere mold at least 1.37” deep
- 1 small heat-safe plate
- Food safe gloves (optional)
How to make Hot Cocoa Bombs:
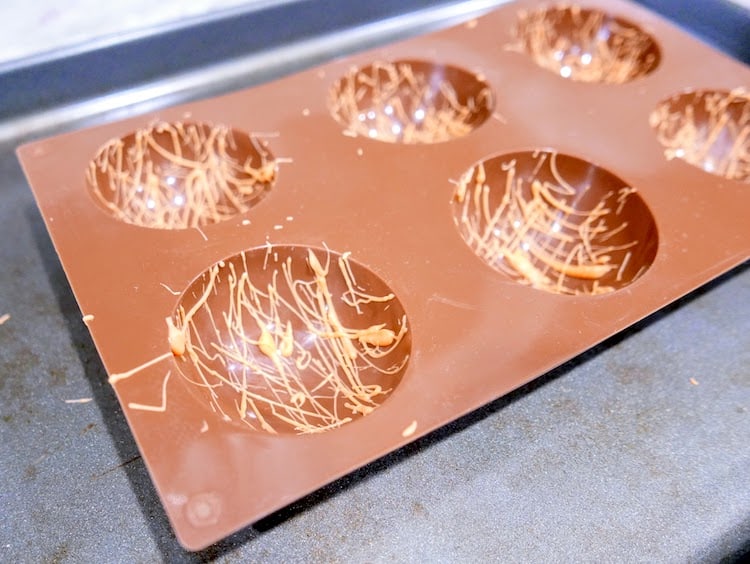
Heat ¼ cup of orange candy melts in a glass bowl in the microwave for 1 minute at 50% power. Stir well, and continue heating in 30-second intervals until the wafers are fully melted and are smooth/creamy.
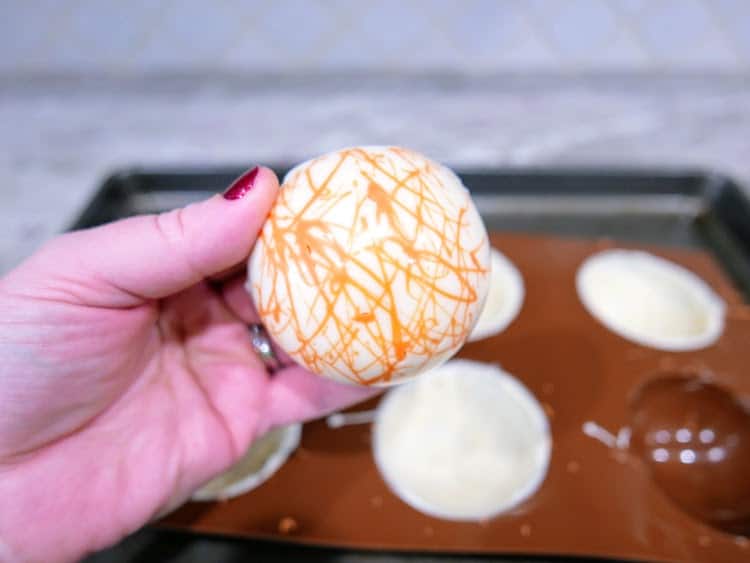
Place the silicone sphere mold on a flat serving tray or baking sheet. Dip a small spoon into the candy melts, and drizzle back and forth all throughout each mold. You only want thin, small lines and flecks, so make sure you don’t have too much of the candy melts on your spoon. Place in the refrigerator for 2 minutes to set.
While the orange melts are setting, heat the white candy melts in a microwave-safe glass bowl for 1 minute at 50% power. Stir well, and continue heating in 30-second intervals until the wafers are fully melted and are smooth/creamy.
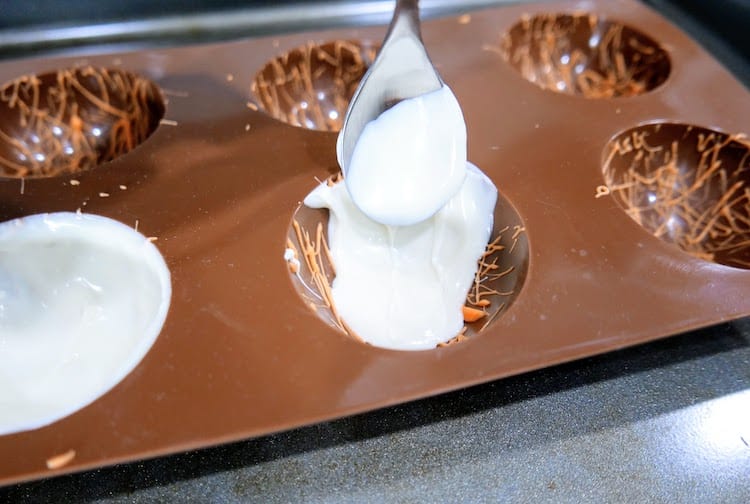
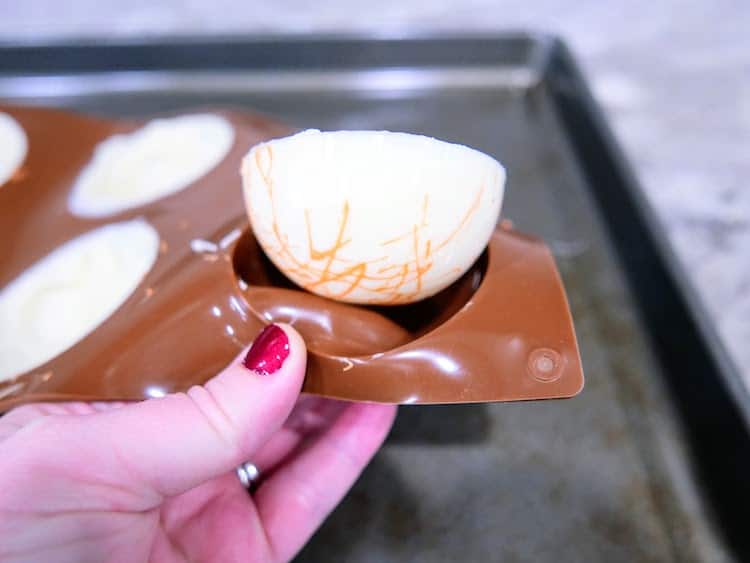
Remove the mold from the refrigerator. Spoon approximately a tablespoon of the melted candy wafers into the molds. Thoroughly coat the inside of the mold with a small silicone spatula or the back of a spoon. Make sure to make the edges a little thicker, so that they don’t break when melding together. If the candy is pooled at the bottom, spread again to evenly coat all sides, or your sphere will be less circular, and more flat on the bottoms from the pooled candy. Place in the refrigerator again for 3-5 minutes to set.
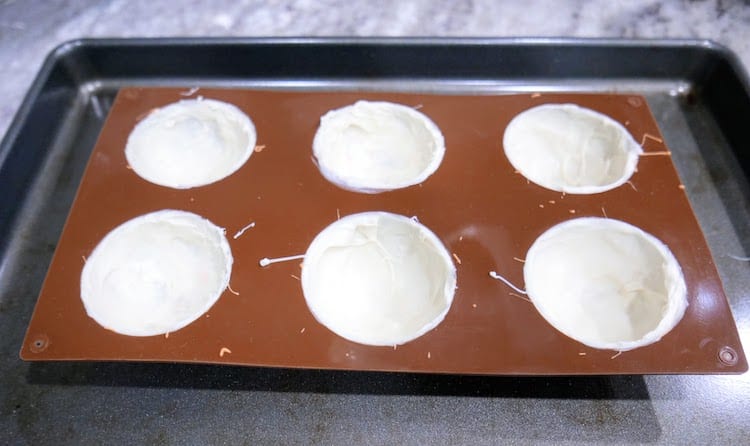
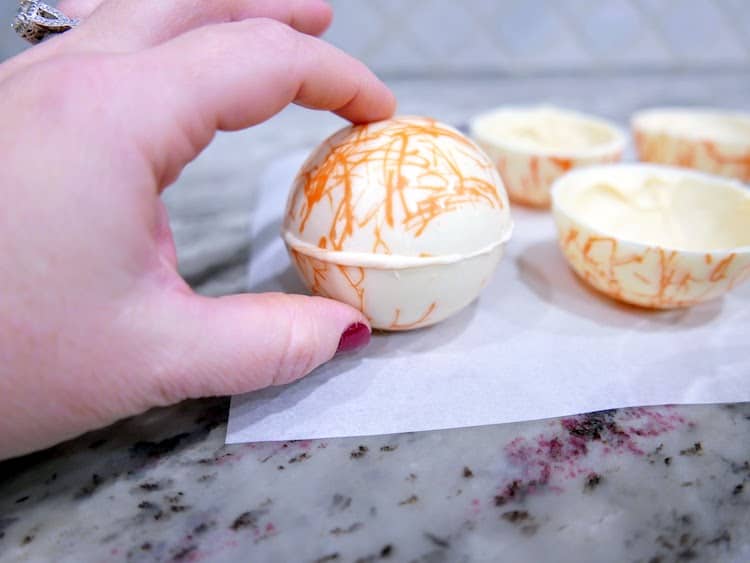
Once set, remove from the refrigerator, and slowly pull the mold away from the spheres on the sides first, and then lightly push from the bottom to remove them. You can either place them on the serving tray/cookie sheet or placed them on a piece of parchment paper for the next steps. Try to handle them as little as possible to avoid fingerprints, or melting. (To reduce fingerprint smudges, wear food-safe gloves)
Place a small plate in the microwave and heat for approximately 20 seconds. Place a white sphere open side down onto the plate. Twist it a little to get the edges slightly melted.
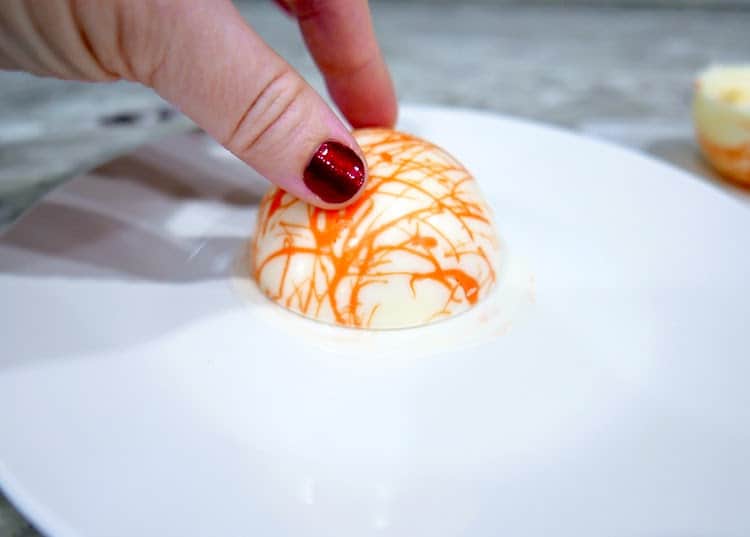
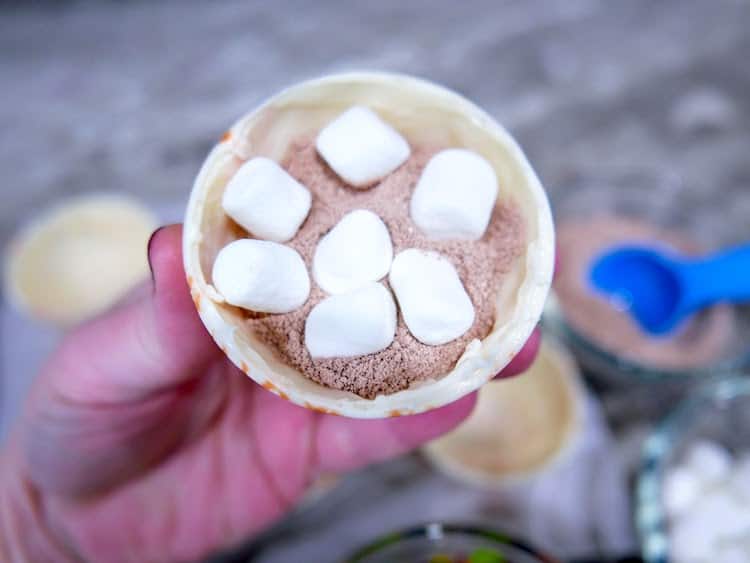
Immediately flip back over and fill with a heaping tablespoon of hot cocoa mix, about 7-8 marshmallows, and approximately a teaspoon of Fruity Pebbles Cereal.

Place another sphere on the plate and twist, and once the edges are slightly melted, place it on top of the filled sphere. You can twist them slightly to help melt them together. There should be a thin line of the melted candy around the seam. If there isn’t, you can use your finger or the back of a spoon to add additional heat to the seam to seal it.
Immediately dip the seam into Fruity Pebbles Cereal.

Repeat this process to make 3 hot cocoa bombs.

Place the remaining ¼ c of orange candy melts in the microwave, and repeat step 1 to fully melt. Once smooth and creamy, drizzle the orange melts on top of each cocoa bomb, and then immediately sprinkle more Fruity Pebbles Cereal on top. Let them set for 2-3 minutes.

How to enjoy the Fruity Pebbles Hot Cocoa Bombs:
- When you're ready to enjoy your hot cocoa bomb, heat 8oz of milk in the microwave, or on the stovetop. Place your cocoa bomb in a mug, and slowly pour the milk over it. Stir lightly to open the bomb and see the hot cocoa explode. Continue stirring until the candy melts and cocoa mix have melted, and enjoy!

Fruity Pebbles Hot Cocoa Bombs Tips:
- While handling the spheres, wearing food-safe gloves will help keep them from melting, and also minimize your fingerprints on them.
- If your candy melts are not smooth and creamy enough, you can add a very small amount of Crisco or coconut oil to the bowl and mix well.
- To melt the sphere edges, you can either use heated plates or a lightly heated frying pan. I have used both, and both are equally effective.

Fruity Pebbles Hot Cocoa Bombs
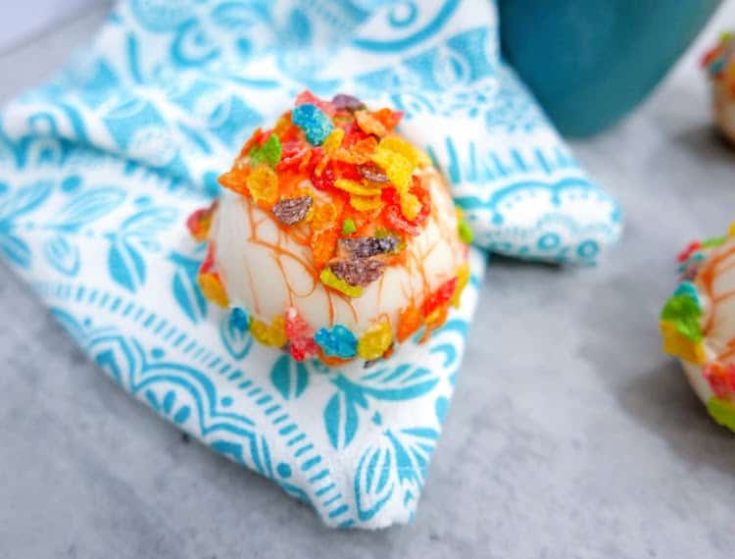
Enjoy a Fruity Pebbles Dessert as a Hot Chocolate bomb!
Ingredients
- 1 ⅓ c white candy melts
- ½ c orange candy melts, divided
- ½ c Fruity Pebbles Cereal
- ¼ cup mini marshmallows
- 3 heaping tablespoon hot cocoa mix
- Silicone spatula
- Small spoon
- Silicone half-sphere mold at least 1.37” deep
- 1 small heat-safe plate
- Food safe gloves (optional)
Instructions
- Heat ¼ cup of orange candy melts in a glass bowl in the microwave for 1 minute at 50% power. Stir well, and continue heating in 30-second intervals until the wafers are fully melted and are smooth/creamy.
- Place the silicone sphere mold on a flat serving tray or baking sheet. Dip a small spoon into the candy melts, and drizzle back and forth all throughout each mold. You only want thin, small lines and flecks, so make sure you don’t have too much of the candy melts on your spoon. Place in the refrigerator for 2 minutes to set.
- While the orange melts are setting, heat the white candy melts in a microwave-safe glass bowl for 1 minute at 50% power. Stir well, and continue heating in 30-second intervals until the wafers are fully melted and are smooth/creamy.
- Remove the mold from the refrigerator. Spoon approximately a tablespoon of the melted candy wafers into the molds. Thoroughly coat the inside of the mold with a small silicone spatula or the back of a spoon. Make sure to make the edges a little thicker, so that they don’t break when melding together. If the candy is pooled at the bottom, spread again to evenly coat all sides, or your sphere will be less circular, and more flat on the bottoms from the pooled candy. Place in the refrigerator again for 3-5 minutes to set.
- Once set, remove from the refrigerator, and slowly pull the mold away from the spheres on the sides first, and then lightly push from the bottom to remove them. You can either place them on the serving tray/cookie sheet or placed them on a piece of parchment paper for the next steps. Try to handle them as little as possible to avoid fingerprints, or melting. (To reduce fingerprint smudges, wear food safe gloves)
- Place a small plate in the microwave and heat for approximately 20 seconds. Place a white sphere open side down onto the plate. Twist it a little to get the edges slightly melted, and then immediately flip back over and fill with a heaping tablespoon of hot cocoa mix, about 7-8 marshmallows, and approximately a teaspoon of Fruity Pebbles Cereal.
- Place another sphere on the plate and twist, and once the edges are slightly melted, place it on top of the filled sphere. You can twist them slightly to help melt them together. There should be a thin line of the melted candy around the seam. If there isn’t, you can use your finger or the back of a spoon to add additional heat to the seam to seal it.
- Immediately dip the seam into Fruity Pebbles Cereal.
- Repeat this process to make 3 hot cocoa bombs.
- Place the remaining ¼ c of orange candy melts in the microwave, and repeat step 1 to fully melt. Once smooth and creamy, drizzle the orange melts on top of each cocoa bomb, and then immediately sprinkle more Fruity Pebbles Cereal on top. Let them set for 2-3 minutes.
How to enjoy the Fruity Pebbles Hot Cocoa Bombs:
- When you're ready to enjoy your hot cocoa bomb, heat 8oz of milk in the microwave, or on the stovetop. Place your cocoa bomb in a mug, and slowly pour the milk over it. Stir lightly to open the bomb and see the hot cocoa explode. Continue stirring until the candy melts and cocoa mix have melted, and enjoy!
Notes
Fruity Pebbles Hot Cocoa Bombs Tips:
- While handling the spheres, wearing food-safe gloves will help keep them from melting, and also minimize your fingerprints on them.
- If your candy melts are not smooth and creamy enough, you can add a very small amount of Crisco or coconut oil to the bowl and mix well.
- To melt the sphere edges, you can either use heated plates or a lightly heated frying pan. I have used both, and both are equally effective.